Sunday, February 21, 2010

Weathered Teddy

Okay, so now I feel a little bit guilty about relegating poor little Teddy to the windy, wild, winter weather. It looks like his tears have frozen to his face!! :-O

On the Plus Side!....the book is becoming nicely discolored from the wrappings I used to hold my bundle all together! :-)


Wednesday, January 27, 2010

Snippets from the Past

Years ago when my mother, aunt, daughter and I were cleaning out my grandmother's house we came across boxes (and boxes) of neatly bundled cards and letters that she had kept since moving into the house in 1949 (the current year was then 1997). Not being able to bear to toss them, I took the lot home with me where they have been stored, waiting for me to figure out what to do with them.

Some of them I had used in Christmas ornaments. Some I used in altered tins that I gave to my family. The leftovers from those projects were still sitting around so I decided to go through the rest of the cards and letters to see if there were any that needed to be saved to other locations.

I came across a couple of birthday cards/letters written by my sister to my grandmother, from 1987 and 1986. In these letters she talked about her young children, the youngest being a new baby in 1986. Sweet little snippets in life. Written snapshots.

I knew immediately that I had to return these to my sister so I set them aside.

Fast forward a couple of days and I'm thinking that just handing them to her sounded so...boring...LOL! So started to think of a more proper "presentation."

This is what I came up with....the envelope is a sturdy double-sided design scrapbooking paper. The image on the envelope came from the card that accompanied one of the letters.The postmarks are from the original envelopes.


I edged the sides of the envelope with Distress Ink,
and the text on the back came from the inside of the same card.


Then, to identify the letters, I stamped the years they were
written on the letters themselves and slipped them in the
hand-made envelope. She loved them, by the way....:-)


Sunday, January 03, 2010

First Snow

Not the first snow of the season (not by a long shot), though it may be the first snow of the New Year, but seeing how it's only the 3rd of January... But it is the first snow on my Erosion Bundle and Teddy is covered with it!! :-)


Friday, January 01, 2010

Erosion Art Bundle 2010 :-)

Who knew that gathering and bundling and hanging “stuff” outside for a few months could be so much fun! I am participating in the Erosion Bundle Project for 2010, which entails gathering items from the house/garage/art supplies/wherever you can find them, and bundling them together to hang outside to let the elements do what they will with them, and then creating an art project with the “remains” of whatever Mother Nature left for you!

We are supposed to hang them out starting January 1, 2010 and retrieve them on April 15, 2010, and have a finished art piece by August 1st.


My “stuff” included in my bundle:
Jute, blue and natural colored
Plumber’s strap
Silk leaves
Green macramé yarn
Rolled paper, green and natural
Leather piece
Metal heart
Blue/yellow/purple fluffy yarn
Lace, cream and white
Blue/green/purple material
Red/purple/yellow “point cards” from work (aka cardstock)
Denim pocket
Raffia
Copper wire
6 strips of homemade papers
Christmas wrap from Diva swap
Bingo cards
Puzzle pieces
Book
Mini Teddy Bear

And as an afterthought:
Canning lid ring
A different copper wire
Plain ol’ wire
Paint brush
Mat frame

I wrapped everything in and around the book with the yarns, and wires (hope I can get it off again!).


A close-up...
 
(Mini-Teddy looks kinda scared...LOL!)

And the top and bottom of the bundle...


Then I hung my bundle on the birdfeeder stand on the north side of our house. This’ll be great as I can see it from my kitchen window when it gets snowed on, rained on, and blown around! The sun may even hit it late in the afternoons.


So have at it, Mother Nature! And let’s make art come April!

Wednesday, December 09, 2009

Oh, Christmas Wreath!


My today's project was getting my store bought wreath all prettied up and mounted above my mantel-less mantel. :-)  The lights were already strung on the wreath so all I had to do was to place the balls and the drape the ribbon. I love the rich, elegant look.


Monday, November 23, 2009

Thus, the Rose...

Thank goodness for a slow week at work so I could start/finish 17 beads for a "Diva Rosarie Bead" swap with my Altered Art Divas.

Rolled paper beads were coated with pearlized paint and embellished with FIMO hearts, painted red, and wrapped with copper and/or silver wire. It was one of the hardest and easiest swaps I've participated in so far.

Hard, because the bead was supposed to represent us/our life/etc...tell something about us.

Hard, because I had NO idea what I was doing, or how the heck I was going to make a bead, let alone 17 of them!!

Easy, because once I did a bit of research on bead-making and coming across this tried and true (and quick and easy) method, and figuring out how to embellish the beads, the rest just fell into place.

And easy, because I really did do the bulk of it at my desk at work! LOL!

The rose embellishment represents my life because of my flower gardens, and the roses my grandmother just to grow, and not just a little bit because my grandbaby's name is "Ava Rose"...:-)

Thus, the Rose...:-)


Monday, September 28, 2009

watch the Water fall


Just a little something from the latest batch of pictures from our Ava Weekend. She loves to take walks, more specifically she loves to walk though the campus grounds where the water fountains run. I think she would sit there all day if we let her! And if we're really lucky, we'll have a penny with us to toss in to make a wish! :-)

Nothing fancy used in this LO. I cheated and used a sample page from Storybook Creator. Though I did change the background paper color from greenish to blues to better reflect the water. :-) I thought it all looked rather fall-ish...

Sunday, September 06, 2009

Altered Halloween Cabinet Cards


My altered Hallowen Cabinet Cards for the Diva Halloween Swap. The original cards were scanned and copied, then embellished digitally with the corner frames. The background was made to resemble the old-time card backings, complete with photog's "company" name. :-) What doesn't show in the scan very well is the crystalized dabs of paint to highlight the "frames," and I blurred out my name and addy in the right-hand corner. The bats, cat, ghost, and pumpkins are foam pieces found at Dollar Tree. Colored staples anchor the corners.

Saturday, August 29, 2009

Laugh Every Day


Playing with layers again...Love her smile, it's my favorite thing...ever...:-)

Friday, August 21, 2009

Remember Moments


So it's been awhile since I've played with pics just for the sake of playing with them, other than the class pics from below, yet this also falls into the category of using some of the techniques I learned in that online class using masks. I LOVE using masks! And layers. I was using layers before, but not so many at one shot. Now I have to watch myself that I don't overdo the technique! LOL!

Friday, August 07, 2009

Combining Days 1, 2, 3, and 5


Because I was bored last night, and really just wanted to "play," I used my favorite photo of my favorite granddaughter (and only) and combined the vintage, hand-tinted look, added a frame to it, and used three different textures, playing more with the opacity button on the textures, and added a couple of the new leaf brushes that I'd found. I really like the way this turned out. Then I added the text, where I was happy that I remembered how to "curve" my text! I think I'm hooked!!

Now I have to get going and move on to Day 6...TTV?? Hmm...guess I best get to crackin' to see what this is all about!! :-)

Jessica Sprague Digital Online Class - Day 5, Textures

Textures are fun! Textures are awesome! I've played with them before but never used more than one to texture a photo, much less three! Who knew!!

Using downloaded textures from Jessica's class, I used a film texture, grunge, and brown paper bag. I also desaturated the photo to give a more old-time look. Then used added on some text because she just looked like a dreamer here...:-)


Jessica Sprague Digital Online Class - Day 4, Clipping Masks

Day 4 was a tricky little bugger. Insofar as that PSP doesn't "clip" the way Photoshop does, so I have to go a'Googlin' to find an alternative method because from the instructions and examples that Jessica used, this just seemed WAY too cool not to try!

I did find some initial instructions from Designer Digitals but holy mackerel(!) it was a complicated mess! I did finally achieve a clipping mask, but oddly enough (or not, I may have messed up along the way) I couldn't seem to duplicate my efforts with the same consistency.



And yes, I used the same photo as in Lesson 4. ;-)
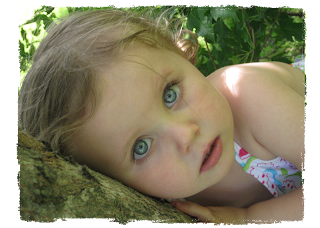


So I went searching again, and found this, by a poster named "chantillylace," which seemed a better, MUCH less complicated method to simulate the desired effect, using the materials/texture palette and flood fill. It did alter the overall look of the mask somewhat, but it's still effective.


Meanwhile, while playing with the layers and masks and what-not, I accidentally created the image I was looking for, only wasn't sure how I did it!! Fortunately I was able to do it twice. UNfortunately. I didn't know how I got it the second time either! So I worked backwards, using the "undo" button (thank you whoever created this most important feature in programs), and figured it out...eventually...

For anyone using PSP and wanting to use the clipping mask technique, this is how I did mine:

Open up both the photo and mask images.
Layer the mask over the photo.
Right click on the mask.
Click on: "New mask layer"
Click on: "From image"
Make sure the photo name OF your mask is in the source window.
Check the button for "source opacity."
Click: OK
Duplicate the photo you're using.
Delete the original, or hide it.
Move the photo to the bottom layer of your "Group."
Delete the original mask, or hide it.
Voila'!!!
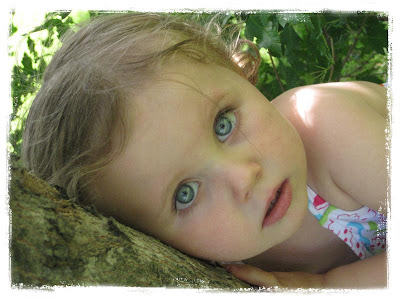

You have your clipped mask! I'm sure there is some fine-tuning that could be done to the photo/mask/etc, but I was just thrilled to be able to DO it at all! LOL!


Jessica Sprague Digital Online Class - Day 3, Create a Vintage, Hand-tinted Look

I think Day 3 has been my favorite so far. I love the vintage look this technique brings, and the depth it brings to the image. Added hand-tinting just adds to the wonderful overall vintage feel to the photo.


The first photo is one sent to me by Ava's Momma. It was just begging to be played with (the photo, not Ava, though she begs to be played with too...LOL) I used Jessica's techniques with no problem in PSP. Both programs are very similar in how they name/describe their tools and uses, though the tools are in different locations so I usually had to go looking for the right one! Which was good, actually. Made me explore my own program a bit more thoroughly than I normally would have.


The second photo is just a zoomed-in version of the one above, just because I could...;) and softened for a more dreamy effect.


Jessica Sprague Digital Online Class - Day 2, Brushes

Day 2 was working with Brushes, something I'd only tinkered around with in PSP previously. I did learn how to resize the brushes as a result of having to work with brushes for this class, and I found several cool new brushes and figured out how to install them into my program, so now I'm all set for playing with brushes in the future! And have a new pastime as I search for more brushes to use in future projects! :-)

I did use the brush that Jessica provided with the class, just to keep things simple for now, but I played around with the color to better match it to the subject (again, my favorite little girl in the whole wide world...:-) And I added some "paint splatters." I also added a frame about this photo because it seemed like it was lacking...

Jessica Sprague Digital Online Class - Day 1, PNG Frames and Word Art

Okay, it's been ages since I've posted on my blog, so thought I'd post some of the results from an online digital class I've been taking from Jessica Sprague. I've learned TONS so far from her instruction and am not even done with the course yet! As an added challenge, while she uses Photoshop in her directions, I have only Paint Shop Pro Photo X2, so I have to translate instructions from the one program into mine! So far I've been able to figure it all out, but not without some mild frustration. ;) Like I said, just adds to the challenge! LOL!

Day 1 - PNG Frames and Word Art

This was fairly simple as I've done similar steps before in PSP or in my Creative Memories program, StoryBook Creator 2. I've used a photo of my favorite subject, of course!! :-)

I did learn how to resize a photo to a specific size a whole lot easier than the way I had been doing it!

Saturday, April 25, 2009

Toe Art! :-)

I haven't posted in ages - thanks, Life! - and then I didn't post because I've been laid up due to foot surgery (I'll spare you the gory details). So between the surgery, meds making me stupid, and a back that's been aching from sitting/walking crooked, my poor 'puter hasn't gotten the workout as I'd hoped!

Anyway...

Due to sheer boredom one day, I broke out the nail polish and decided to paint my toes (or, nails, to be specific). Couldn't decide on blue or purple, so went with both! Then that looked too boring, so decided the big toes needed some additional decoration and painted flowers on each!

To spare you the vision of my feet/toes, I cropped the pics to show just the "Toe Art." The following pic is a page out of my "365 Project" in which I'm taking a pic a day for a year.
The toes are no longer blue and purple though...through wear and tear and wonderously soothing tub soaks, they have been repainted red and pink - flowers to come! :-)

Saturday, February 21, 2009

OWOH

Looky at what I won! :-)

A beautiful Purple Fairy from Judy Keefe of
JMK Originals. She was part of the OWOH (One World, One Heart) event by offering this exceptionally beautiful art doll on her blog for a prize simply by commenting on her blog. I am so happy that I choose to click on her link and reply! She's simply beautiful! And she came on a day when I happened to be wearing purple anyway, so we match quite beautifully! :-)

Thanks again, Judy! I will smile whenever I look at her. :-)

And yeah...I just noticed that my hand is covering up her beautiful base on which she stands! Sheesh! LOL!

Friday, February 20, 2009

Hangin' Out


A fun page with pics we took when we went to the Children's Museum of Minnesota, in St. Paul, over Valentine's weekend. Ava seemed to have a good time, even though she wasn't feeling 100%. Found the images/background from....well, carp, can't remember where I got them from now! But they were a "collection" from somewhere!! LOL!

*edit*
AHA! I found it! Backgrounds, and images came from http://www.scrapgirls.com/. Like to give credit where credit is due! :-)

Tuesday, February 17, 2009

Hope


Playing around with a new technique - making a grid template. Had I known how darn easy it was, I'd have done this eons ago!

I created this in Creative Memories Storybook Creator, simply by using a collage page already in the program (I cheated, though you could make your own grid, with pretty much any shapes you wish), then highlighted the squares (and in this case, the stitches holding the little squares together), flattened the images as a whole, then filled in the selected image with my picture! And voila'! I have Ava in a grid! :-) I also overlaid a background over the photo and adjusted the opacity to give it soft effect.

Yup! I can see I'm going to use this again!! :-)